Proverbs 27:27 And thou shalt have goats' milk enough for thy food, for the food of thy household, and for the maintenance for thy maidens.

Wednesday, May 29, 2013

To Milk or Not To Milk

To milk or not to milk them?  That is the question. 

I have my four Nigerian Dwarfs ready to kid any time.  When I bred them I had planned on hand milking them from the start. I have always felt it is really best to do that with any dairy goat. Milk them from the start to train them and then keep their lactation going as long as possible their first year.  If they had shortish teats they will lengthen out really well thru that first milking year and be even better by the next lactation.

But I had also wanted to see what I would get when crossing my two big wonderful milkers with our Nigerian Dwarf buck Major Coco.  So I bred them as well. Yes, I know, what was I thinking????!!

Well, as of right now I am covered up with milk.  I thought I would have the energy to keep it all up but can see with us starting back into foster care I don’t want to be stressed or have too much on me at any one time.  Nothing to put to much pressure on me.

I realized my error and I saw this coming.  I have worked diligently to get Twinkie down to once a day milking.  She is still giving ¾ of a gallon once a day.  But I think that will slowly drop to ½ a gallon over time.  Bluebell is just 7 weeks into milking so her production is to high to try to get her comfortably down to once a day milking right now and she is giving over a gallon a day.  Everything that can possibly drink milk on the property is right now!!! Ha ha!

Anyways, back to the Nigerians.  I really don’t need the milk.  I really am not looking forward to hand milking such small first fresheners.  Especially four of them plus my two large milkers daily.  Whew.

I have milked pretty much all sizes of teats over the years but have been spoiled over the last many years with all of my goats having something like this.  After all that is what part of my goal always was.  Long easy to hand milk teats.  I can milk this gal out really quickly.
So I am thinking.....if I leave the babies they have on all the Nigerian Dwarf does, the babies will naturally lengthen out the teats for me for next year.  Also, if I choose to milk any of them during this lactation cycle.  When their babies are two weeks old I can pull them off at night and just milk once a day from the build up of milk thru the night and put the babies on during the day.  Right now I am leaning toward doing that. I normally don't, but this time it would make my life so much easier. 

Here is an udder shot as of today of one of the Nigerian Dwarfs.  First freshener, not uddered up or kidded yet and never milked.  So not to shabby in length so far.  But still not looking forward to it. :)
I also have a back up plan for milking if I am struggling on those smallish teats.  I did buy and receive a Henry Milker.   I have not tried it yet.  But after researching out and reading reviews I thought this one the best. 

Now, I did take my time and do my research before buying these Nigerian Dwarf does and bucks I now have.  They are all from moms that were easy to hand milk.  As that is my goal.  So we shall see how they freshen and  how it all goes. 

I am excited and can't wait to see how this all turns out.  God is so very good always.  If I end up using the Henry milkier at all.  I will do a review and post it on here for anyone interested. 

Blessings and happy farming,
susan

Sunday, May 26, 2013

Four ND Goats to Kid Soon!

I know I keep mentioning that I have our first ever Nigerian Dwarf Goats bred.  In my head I keep thinking that they start kidding June 1st.  That's the first ones due date.  In my head that is a long way off.  As I have so much to get done before June hits.  But......I  was out in the barn yesterday and looking over each goat a bit.  I do this frequently and noticed that all four of the bred Nigerian goats birthing ligaments are loosening up a bit.  Yikes!  Already?  And they all have little udders for the first time.  But their little udders are getting quite large all of a sudden.  So I looked on the calendar and was just shocked.  We are getting close and I am not near ready!!!!!
So I spent the day getting ready.  Just in case.  The first thing that I needed to do is modify my milk station.  It is built perfectly for full sized goats.  I tried putting a Nigerian up in it and they were a tad to short to eat at the feed pan and could easily pull their heads out of the head gate.  It was either build a new smaller version for the Nigerian Dwarfs and have that taking up room in our barn.  Or modify the big one.  So I chose to modify our current stanchion. 
First, I built a riser (stepping stool of types to bring their heads up to the feeder.  I took 2x4s and cut them to make a frame.  Cut a piece of plywood to be the top support piece.  
Painted it.  And will put the same rubber mat on it as is on the current stand for ease of cleaning and make it non-slip.  I will be able to put it on the stanchion when I want to milk a Nigerian and remove it to milk my larger gals.
The other thing to modify was the neck stanchion piece.   It was perfect for the big goats but even closed on the tightest setting the Nigerians could pull their heads out.  I just needed it an inch narrower.  
So I took a scrap piece of 1 x 5 and drilled a hole in the bottom going all the way thru the existing stationary place on the stanchion.  Put a bolt through it so it acts as a moving lever.  Then did the same at the top to secure it when I need it for smaller goats and then swing it back out of the way for the larger goats.  As I will still be milking both sizes at times. (it is swung back out of the way and secured in the above picture.  Notice the hole by it to move it over and secure it when milking a Nigerian Dwarf)

It was a fun and simple project that the Lord helped me figure out and do.  I still just have to put the non-slip rubber matting on it.  But all in all it is workable now.  

Blessings and happy farming, 
susan

Thursday, May 23, 2013

Sweet Potato Fries

I eat a sweet potato in one form or another almost every day.  I have so few things I can eat and sweet potatoes are one of the things I can.  But I can’t have any kind of butter , salt or any type of sweetener that often people put on them to eat them.  I have found ways to eat food that is plain, simple and tastes good the way it is with no extra things that add to my food sensitivities.

So here is one of my favorite ways to eat a sweet potato, made into yummy sweet potato fries.  Ok, I eat them almost daily. :) 

The hardest part of making them is chopping them up as they are so very hard.  No potato fry slicer will do it.  It has to be done by hand.  So it is one of my hubby’s jobs that he does almost daily because he loves me. :)
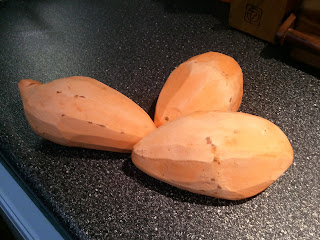
It helps to use very large sweet potatoes.  Peel them.
Chop them into fries as uniformly sized as possible.  My husband usually chops one in half lengthwise so that he can lay the flat side down on the counter to make chopping it into smaller pieces easier and more stable.

Place them all on a cookie sheet and pour a generous amount of olive oil over them.  
I use my hands and then roll them around in the oil till they are all oiled well and shinny.  There should still be a layer of shinny oil on the pan under the fries too so they don’t stick.   Spread them out on the cookie sheet till they are not touching too much and in a single layer.
Preheat the oven to 450 degrees.  Now here is the tricky part.  How long to bake them.  In my convection oven (that bakes things pretty fast) it takes exactly 26 minutes for two cookie sheets to be done.  If I have only one cookie sheet full it takes less time. (23 minutes)  It might take you a time or two to figure out the perfect amount of time.  All I can say is you don’t want mushy fries.  When baked correctly they will look a bit burnt when done and taste amazing that way.  As the burnt areas are caramelized a bit and yummy.  Actually, I even like eating the undersized burnt ones that over baked and are like charcoal.  :)  Strange I know.

Now, when we make these sometimes it sets off the fire alarms in the house for a moment when we open the oven.  Because if they were not cut to all being about the same size some will burn before others are done.  I like them in all stages of cooking so we don’t pay much attention to all that anymore.
Ahhhh, here is what I eat every Friday for Friday night movie night.  All I can eat sweet potato fries and all I can eat wings.  I have only found one brand of wings I can eat and not have a reaction to.  These are not injected with broth like most wings.  We bake them with nothing on them till they are crispy and they taste great. 
Blessings and happy farming!
susan

Monday, May 20, 2013

Baby Goats and Constipation

We have been raising goats for many, many years.  Over the years, when we first started out,  I had lost a baby goat every few years to a mysterious illness.  It happened a few times on babies that I had left with their moms and also a few bottle babies. 
These babies would seem bouncy and happy and healthy and want to nurse but would all of a sudden just stop eating or not finishing their bottles.  No diarrhea or un-thriftiness (at first).   Their tummies would still be full of undigested milk from their last feeding, that was many hours ago.  You could actually, usually, pick them up and hear the milk sloshing in their gut.  This has happened at many different ages to us over the years.(a handful of times)   The first times this happened…I could not get the babies to start back to eating nor the milk to digest in their tummies and within two days or so the babies would die.  It was frustrating for sure to see them slowly loose strength and waste away. 
Then about seven years ago I stumbled upon a statement, on a goat form, and got a hint to what was going on.  The article suggested constipation.  I had researched and researched and had never found any articles on what it could be.  It was never mentioned in any of my goat books and the vets I had consulted with had no clue.(I had paid a vet to try to save them the first couple of times this happened)  Could it really have been that simple to save the babies I had lost?  I felt terrible.  That very same year we had a baby stop nursing and the milk not digest from the previous nursing.  I took a large (needleless) syringe and filled it with warm water.  I gently put about a half an ounce of warm water up the poor babies bottom.  By the time the next nursing time came along.  Walla, all the milk in its tummy had been digested and it was so eager to eat and downed its whole bottle.  This has worked every time now over the last many years. (sometimes they need two treatments)
The reason why I am bringing this up and what has brought this to mind is that Calfy, our 6 week old bottle fed doe, that is out of Bluebell started not finishing her bottle a few days ago.  She acted like she wanted to eat but would not latch back on and finish.   I let it go for two feedings.  She just didn’t want to finish and was not eating with gusto.  She was bouncy, playing and still nibbling around at food but not eating really well.  No loose stool.  She was the right age for coccidia but again, no loose stool. I thought about deworming her but don’t like to deworm till 8 weeks if at all possible.   I prayed about it.  She is older than any other baby I have ever had go thru this.  But decided it would not hurt to try and see if that fixed it.   By golly by the next feeding she was back to her normal piggy self, downing her bottle in record time.  :)
I just thought I would share this because I lost a few babies to this over the years when I first started out with goats.  It is ashame to loose any.  Especially if there is an easy fix like this.   I had no idea and many people don’t know about this.  I have had many calls from people that I have told this exact info to and it was just what they needed to help their baby goat.

Blessings and happy farming,
susan 

Thursday, May 16, 2013

Tying up Tomato Plants

When I first started gardening I used tomato cages that were readily available at any garden store.  Every year they worked great for the first part of the gardening season but as the plants grew bigger and the branches got heavy with fruit, I would have a storm, strong wind or just the heavy nature of the plant would topple it over or branches would snap.  I was always disappointed. 

The next thing I tried was staking with huge stakes and although they kept the plant nice and straight and tall, I would still loose branches that were heavy with fruit.

So one year I did a lot of research and found this method of stringing them up to a support pole that runs the length of the row of plants.  It worked wonderfully and that is the way I have done it every since.  For us it just works very well. 

I take a metal pole and tie it up onto T-posts directly above my tomato plants.  I put it fairly high up because tomato plants can get very tall. 

Then I take hemp twine and cut a piece long enough to go "double" over the pole, down to the ground and be about 8 inches longer than my plant base.

I tie it just once in the exact middle of the string, on pole, directly above the plant to be tied, to keep it from slipping around at all down the road.
I double the string as the plants get really heavy as the season progresses and it gives a lot more support to use a double string. 

I then take the extra string and tie it very loosely around the base of my Tomato plant.  I leave enough room for plenty of growth.
The next thing to do is to hold onto the knot to keep it from just going around and around the plant as you wrap the string around and up the plant.  So hold the knot and wrap the string around the plant, wrapping in between the branches, vineing the tomato plant up the string.
As I am out working in my garden pinching suckers and weeding, if I notice the plant has grown I wrap the string around the new top growth till the tomato plant at the end of the season is totally supporting by wrapping the twine all the way to the top.  If there are any branches that get heavy and need support I simply tie a piece of hemp string to that branch and tie it to the pole above for support.  Works really well.


Blessings and happy gardening,
susan

Tuesday, May 7, 2013

Our Cup Runneth Over!

Ok, Yes, we are very, very blessed here on the farm.  God  is so very good to us always but I am jokingly referring to the huge amounts of rain we have gotten over the last few days.  Much needed I might add.  I have had to stay inside a lot the last few days so my house is now nice and clean.  :)  I had nothing better to do.  The above picture was taken from my bedroom deck several weeks ago.  Isn't it a beautiful view?  See how the pond is within its boundaries?  The ground was already saturated then.  Then over the last many days it has rained just inches and inches of rain.

But watching it rain for so many days made me also really want to get outside and work as the weeds are loving this rain and growing faster than my veggies.  Anyways, I decided to go down and take a look at our over flowing pond this morning.  So put on my water proof boots, that I found out were really not.  :)  And took a stroll around the lower end of our property.
      This was taken last year 2012 during the spring rains!

We live in the North Georgia Mountains but in a small valley.  We get the run off of any extra rain when it comes thru.  This has many benefits as when others are dry our water table is up.  But we also get very, very spongy wet for a while when others are just wet.  This week has been one of those times.
Our pond is usually just that, a pond.  No inlet or out let.  When we have rains like this we have wet weather creeks that enter into it as well as many springs that run this time of year.  It fills the pond to overflowing and that whole end of the property is just soaking wet for quite a while.  We have had in the past so much water running down our property that it looks like we live next to a small river for several days.  Here are two pictures of my children playing in it when that happened many years ago before we had a pool!


This is what the dock looked like April 24, 2013 during Carolyn's photo shoot we did.
This is our little dock this morning.  Floating!  That is why we have it anchored down with T-posts and chains.  For this time of year.  So it doesn't float off.  See how far the water is out of it boundaries!
                        Another view.
This is the outlet end where it over flows.  My dad has a huge pipe buried under the road as an overflow.  But it is no match for such heavy rains and run off.  This is a 20 foot wide area of water flowing over the road that goes around the back of our pond.  We have permanent sand bags in place in a row here to cut down on erosion.  I have seen baby fish going over being shared with other ponds I hope.    
Just some pictures of the area it has overflowed onto.
It is supposed to be nice the next couple of days.  Hopefully we will dry out some and I can get out in the gardens and raised beds to do some work and weeding.  :)

Blessings, and happy farming,
susan


Saturday, May 4, 2013

Farmhouse Meatballs

At the farm here we eat a lot of simple, rustic but wholesome foods.  We try to use what we have available on our farm in season and whats available to us in our area and cook a lot from scratch.  I guess I am just saying we don't really eat fancy or a lot of processed pre-made foods.  Today, I am going to share with you our meat ball recipe.  We make huge meatballs from ground deer meat.  It is my families favorite way to have them but you could make them from ground beef as well.  To me ground beef is just a lot more greasy when you make them. 

I initially came up with this recipe as my son Zeke is on a casin free/gluten free diet for his autism.  When I first started making them for him I used cooked quiona or cooked millet and they turned out well.  But over time  we found he does not react to oats.  So this is the way we make them now.  With rolled oats.  Again, I make huge amounts of food here for my large family.  So you can half this recipe if you wish.  Oh, by the way, Zeke is the reason why I only have shredded cheese on half of the meatballs in the above photo.  He can't have dairy. :)                       

2 - pounds of ground deer  (or ground beef)
1 - 28 ounce can of diced tomatoes
¾ - teaspoon salt
Pepper -  hum..I never measured this.  Quite a few good shakes.  :)
¼ - teaspoons cumin
1/8 - teaspoon ginger
5 - cups uncooked rolled oats
6 - eggs

Take a large baking dish and rub the inside down with some olive oil.  (or you can use olive oil spray) and set it aside next to where you are working. (your hands will be to messy to do this later :) )

In a large mixing bowl combine the diced tomatoes, salt, pepper, cumin, ginger, and eggs.  Next add the raw ground deer meat and (I use my hands to blend in the rest)…. The tomato mixture, deer meat, and uncooked rolled oats.  Add the oats a little at a time till it is all incorporated well. 

Then take some and make a ball out of it.  It will be a bit loose but will make a very nice moist meat ball when done.  As they bake the oats will absorb a lot too.  I make them all uniform in size so they all bake evenly but I make them pretty large.


The reason why we make them so large is that my family eats them on huge toasted and buttered rolls as a meat ball sandwich. (basically huge garlic bread with huge meat balls in the middle, yum!) 
Anyways, put them in a preheated oven set at 350 degrees and bake them for 1 hour. (Every oven is a bit different, but this is what it takes for mine :) )    After the hour take them out and pour your favorite spaghetti sauce all over them and then sprinkle shredded mozzarella over them and put them back in the oven for 5 or 10 more minutes.  

Now you can do all kinds of things with them.  Eat them on pasta, on toasted subway type rolls, on home made rolls, as a meat with a side salad in the summer.  Actually in the summer this is a really good way to use up those extra big juicy tomatoes. 

Now if you have a child that cannot eat rolled oats and needs a gluten free diet, this is how I used to make them for Zeke...........  You can cook Millet and add that in instead of the uncooked rolled oats.  I never measured how much but just keep adding the cooked millet as you mix it all in together.  When it is stiff enough to form a loose meatball then pan them up to bake them as you would do above.  If your child can not have dairy then either hold off on the cheese or I use my sons special cheese made from rice that is casin and gluten free.


Psalm 3:8  Salvation belongeth unto the Lord: thy blessing is upon thy people. Selah.
 
Many blessings on your day and life, 

susan